Paris is always a good idea.

Original image found via Pinterest // Font: Metropolis

It seems like everyone is obsessed with Paris lately, including myself. It's always been my dream to one day visit the city of light & love, but sadly I've only been to the Las Vegas version. I can't lie, I've often looked up at their Eiffel Tower and pretended that I was in the real Paris. Hey, a girl can dream! Now that I'm done with school and working full-time, I'm trying to save my pennies so I can make a trip out there one day. In the meantime, I'll satisfy my French obsession with a few French-inspired pieces for my wardrobe and bedroom.


Outfit Inspiration Images via Pinterest-
Bottom: Classic French Style


1. NYX Matte Lipstick in Pure Red
2. Bien Fait Bandana
3. SS Print Shop "Oh La La" Print
4. Forever21 Trippy Paris Crop Top
5. Madewell Linen Paris Muscle Tee 
6. Forever21 Long Sleeve Crop Top

Bedroom Makeover

I decided a few months ago that my bedroom needed some restyling. I was never crazy about the wall color, and the overall feel of the room didn't quite represent my personal style. So what started out as just wanting a fresh coat of paint on the walls turned into an entire room renovation project. I guess that's the perk of having a dad that does this kind of thing for a living!

I took inspiration from some of my favorites - Breakfast at Tiffany's, Parisian chic style, classic literature, and the Beatles - and incorporated them into my room to make a space that really felt like "me". It's still a work in progress, but I'm really happy with the results so far.


Sources-
Paint Color: Martha Stewart Living- Glass of Milk
Pendant Light Fixture
Gallery Wall:
I Heart Chicago Wall Art
Ladybug Print by ClareElsaesser
John Lennon Poster purchased at Lake Geneva Art Fair

The Essentials: Hair Products

I am lucky enough to have a best friend that is a very talented hair stylist (Hi Renee!) that always steers me in the right direction when it comes to taking care of my hair. I know that everyone's hair is different, so what works for me may not work for you. That being said, I think we can all appreciate a good deep conditioning treatment and beach spray. So here are the hair products that I consider to be essential for keeping my hair looking its best.
Healthy Sexy Hair Shampoo, Conditioner, and Leave In Conditioner - What can I say, I'm obviously a big fan of this line of products by Sexy Hair. The shampoo and conditioner are safe to use on color treated hair, they're sulfate, paraben, and gluten free, and they're moisturizing enough to use every day. They have a subtle scent, but that doesn't bother me since I use so many products after washing my hair.
I recently started using the leave in conditioner, but I know it will come in handy come summer. My ombrè ends tend to dry out in the summer, so this leave in conditioner should do the trick. It's moisturizing without leaving a greasy finish, and my hair looks and feels so healthy after blow drying!

DIY Hair Mask - I use this DIY combo every other week or when my ends start to feel a little on the dry side. It smells amazing and it's a great way to pamper yourself on the weekends. Apply it to your hair, throw it up into a bun, and relax for 30-40 mins (I usually read or paint my nails). Make sure you wash it out really well with shampoo and follow up with conditioner, you want your hair to look healthy and shiny, not greasy!

Bumble & Bumble Surf Spray -  No wonder there is a cult-like following for this spray, it's the best on the market in my opinion! It gives my fine, straight hair just the right amount of grit and texture for that "I just spent the day at the beach" look. It even smells like the ocean. I use it on damp hair before blow drying, on dry hair before curling, and as a refresher on day-old curls. It seriously works miracles on my hair. 

Not Your Mother's Beach Babe Sea Salt Spray - I tried this sea spray as an inexpensive alternative to B&B's (which is not cheap!). It smells like coconut (love) and is a bit more moisturizing than the surf spray (also love). I don't get as much volume from this spray, but I still switch off regularly between the two. 

Paul Mitchell Super Skinny Serum - I'll use this before blowdrying if I want to give my hair a sleek, shiny look. My hair is naturally straight, but this serum gives it a glossy sheen that doesn't look greasy. It helps speed up the drying process and it smells delicious, kinda like candy.

Not Your Mother's Beat the Heat Thermal Spray - I'm guilty of blowdrying my hair almost everyday, so I try to make up for the heat damage by using this on dry hair before straightening or curling. It gives a slight, flexible hold so there's no need for hairspray (which I can't seem to find one I like, shocking isn't it?).

Suave Dry Shampoo Spray - I'll be honest. I use this because it's less than $3. And it smells like pineapple. Oh yeah, and it works. I know that not washing your hair everyday is actually good for it, but I HATE how greasy and flat my hair can get. That's where this gem comes in. It soaks up the unwanted oil, gives my hair some body, and smells like a tropical drink. All for $3 a can. You can't beat that.

Other sources- 
For a great list of beach sprays for all hair types, check out The Beauty Department.
To make your own beach spray and leave in conditioner, check out Sunnie Brook's blog.
If you're not familiar with using dry shampoo, check out this blog post from The Beauty Department. 

Have you used any of these products? Let me know what you use in the comments. Also, hair spray suggestions would be greatly appreciated!

The Essentials: Skin- Face

My face essentials are a little more involved, but taking care of your skin is very important. I started using eye cream a few years ago when I read that you should start using eye cream in your 20's to prevent wrinkles from starting. It's never to late to start taking care of your skin, and I'd rather use creams now than needles later!


Eye Creams
I apply eye cream in the morning & at night. I use a small amount & dot it along the orbital bone (the bone that surrounds the eye) gently using my ring finger. Since eye creams tend to migrate, I apply it directly BELOW my under eye area and both above and below my eyebrow.

Day // Mario Badescu Hyaluronic Eye Cream - Let me just confess my love for this cream right now. It's hydrating without being greasy, and a little goes a long way. I first read about hyaluronic acid here. It helps lock in moisture to keep your skin properly hydrated. There's complex molecular science at work here, but I won't get into that (unless you're interested). It helps reduce puffiness, minimizes the look of fine lines, and is safe for sensitive skin. And if that isn't enough, it's very reasonably priced compared to other eye creams.

Night // Midnight Recovery Eye - Another one of my all-time favorites, this cream is very light weight and smells AMAZING!! I use this at night after I've washed off all my makeup. I've noticed a definite difference in my dark circles after using this cream for the past year. It's a bit pricier than my other eye cream, but one tube lasts forever since a little also goes a long way.

Face Wash
Day // Simple Moisturizing Facial Wash - I switched to this face wash after noticing that other washes were irritating to my skin. This face wash is free of dyes, artificial fragrance, and harsh chemicals, so it's perfect for my sensitive skin. Simple solution, right?

Night // First Aid Beauty Face Cleanser - I bought this as a combo pack with the Ultra Repair Cream on Black Friday at Sephora and it is seriously a game changer! Again, it's safe for sensitive skin and it's free of Parabens, Sulfates, and Phthalates (harsh chemicals that don't do your skin any favors). It also contains an Antioxidant Booster that defends skin from free radical damage (aka protects against premature aging!) This is something I will be buying again and again.

Moisturizer
Day // Eucerin Daily Protection Face Lotion - This moisturizer is lightweight, fragrance free, and contains SPF 30 sunscreen. I use this after washing my face in the morning to prevent skin damage from those pesky UV rays. I love the sun, but I don't want my face to look like a raisin!

Night // First Aid Beauty Ultra Repair Cream - This cream is perfect for the winter months when your skin needs extra moisture. This thick cream is meant to be used wherever you have dry skin, but is safe to use on the face too. Like the Face Cleanser, it's made without harsh chemicals and it has the Antioxidant Booster, but it has the added benefit of Colloidal Oatmeal, the only FDA-approved, over-the-counter ingredient to treat eczema. I use this at night after washing my face to really lock in moisture.

Treat
Breakouts // Mario Badescu Drying Lotion - This is my Holy Grail for acne spot treatment. Trust me, it works. You just dip a q-tip into the pink stuff at the bottom (DO NOT shake the bottle) and apply enough to cover the pimple and keep it on over night. When you wake up in the morning, that sucker will be smaller and much easier to deal with. I've been using this for years and it hasn't failed me yet. 

Under Eye // Even Better Eyes Dark Circle Corrector - I'll be honest, dark circles have always been a problem for me. My heredity/Greek heritage and career choice all play a part. However, this amazing product has made my dark circles manageable. The cooling metal tip feels great and depuffs as the cream lightens and brightens the under eye area. I usually apply this after my eye cream and before using under eye concealer (I know, I use A LOT of eye creams!). I noticed a difference the first time I used this, and it just keeps getting better with regular use.  

As far as face masks go, I use products I can find in my fridge and pantry. Stephanie Sterjovski wrote a post about her favorite DIY masks & I can't get enough of them. Especially the lemon + honey, it's great in tea, too :)

Thanks for reading about my crazy skin care obsession! Let me know if you have any questions in the comments below.


Next up for The Essentials: Hair Products & Tools.

The Essentials: Skin- All Over

The Essentials.
These are the tried and true, the all-stars in my daily beauty regimen. I'll be posting all of my essentials in different categories - skin, hair, makeup, etc. as a regular feature on this blog. I'm not an expert in these areas by any means, I just like to consider myself an avid beauty product fan (I spend a lot of time at Ulta & Sephora). 

Let's start with the skin, since it is our largest organ and a very important one at that.


Nature's Bounty Healthy Hair, Skin, & Nails Supplements - I have been taking these for about a year now & I've noticed a definite difference in the strength of my hair and nails. I'm in the process of growing out my hair, and I swear it's growing twice as fast after taking these supplements daily. They contain biotin, which helps hair grow, as well as a variety of essential vitamins & nutrients for metabolism and cell repair. I buy them in bulk at Costco, but you can find them at Walgreens or CVS as well. 

Hempz Herbal Body Moisturizer (Original & Pomegranate) - Hands down the best moisturizer I've ever used. This doesn't irritate my sensitive skin (I can even apply it right after shaving!) and it keeps my skin moisturized all day. I recently tried the pomegranate and love it, but the original scent is great, too. It reminds me of a tropical vacation. Plus, it's paraben free, gluten free, and 100% vegan.

Water with Lemon - This is a no-brainer for me. Staying well hydrated is essential to our bodies, both inside and outside. Our skin needs moisture in order to stay smooth, supple, and healthy. The additional benefits of adding lemon to your water are endless (Lauren Conrad talks about a few of them on her blog ). You're supposed to drink half of your body weight in ounces per day to stay properly hydrated, so start sipping!

Coconut Oil - This is another item I buy in bulk at Costco. I use coconut oil for almost everything - cooking, baking, eye makeup remover, hair mask, face & body moisturizer... I can't get enough of it. I mix some up with raw sugar or coffee grounds to make a great  exfoliator scrub. I've saved so much money by using coconut oil in place of makeup remover, heavy face creams, hair deep conditioning treatments, and body scrubs. Seriously, you have to try this stuff. It's going to change your life.

Apple Cider Vinegar - This might sound disgusting, but hear me out - drinking apple cider vinegar is so good for you! I mix a tablespoon of it with unfiltered, organic apple juice and water, add a dash of cinnamon & cayenne pepper, and drink it every morning. It helps with digestion and balancing the body's pH, which indirectly effects our skin. Toxins can build up in our bodies, resulting in breakouts. This helps rid our bodies of those toxins! I also use it to rinse product build-up from my hair and in face masks. It's another natural product that I swear by. Just make sure you buy an unfiltered kind like the one pictured, which you can usually find at most grocery stores. Trader Joe's has a good one, too.

Let me know if you try any of these, I'm curious to hear if they work for you! I would love to hear what your go-to products are too, so please feel free to share.

DIY Gift Idea- Cozy Flannel Infinity Scarf

If you're anything like me, the thought of finding parking, fighting crowds, and standing in line for hours at the mall is enough to keep you locked up in your house with a big glass of wine. Here's my solution- handmade gifts! All you need can be found in one store (preferably Jo-Ann Fabrics, of course), and you can cross a few people off your list in one weekend. Not to mention the fact that your one-of-a-kind gift beats out a gift card for originality and thoughtfulness. And the best part about it? You can still have that big glass of wine while making these gifts, they're that easy.

Here's the first gift idea, it's the perfect accessory for chilly winter days.


Here's what you'll need-

2 yards* shirting weight flannel (it's thinner & drapes better)
2 yards* solid knit fabric
Thread
A sewing machine
Fabric scissors

*You can actually use 1 yard of each fabric if you don't mind having a seam in your fabric where you sew the 2 pieces together, otherwise you'll actually have enough to make 2 scarves!

Directions -
1. Measure and cut your fabric into 62 in x 22 in rectangles. This is the size that I used, but you can change the measurements to whatever you want.


2. Pin your 2 rectangles together along the long edges and sew the two sides. You should have a long tube with openings on either end.

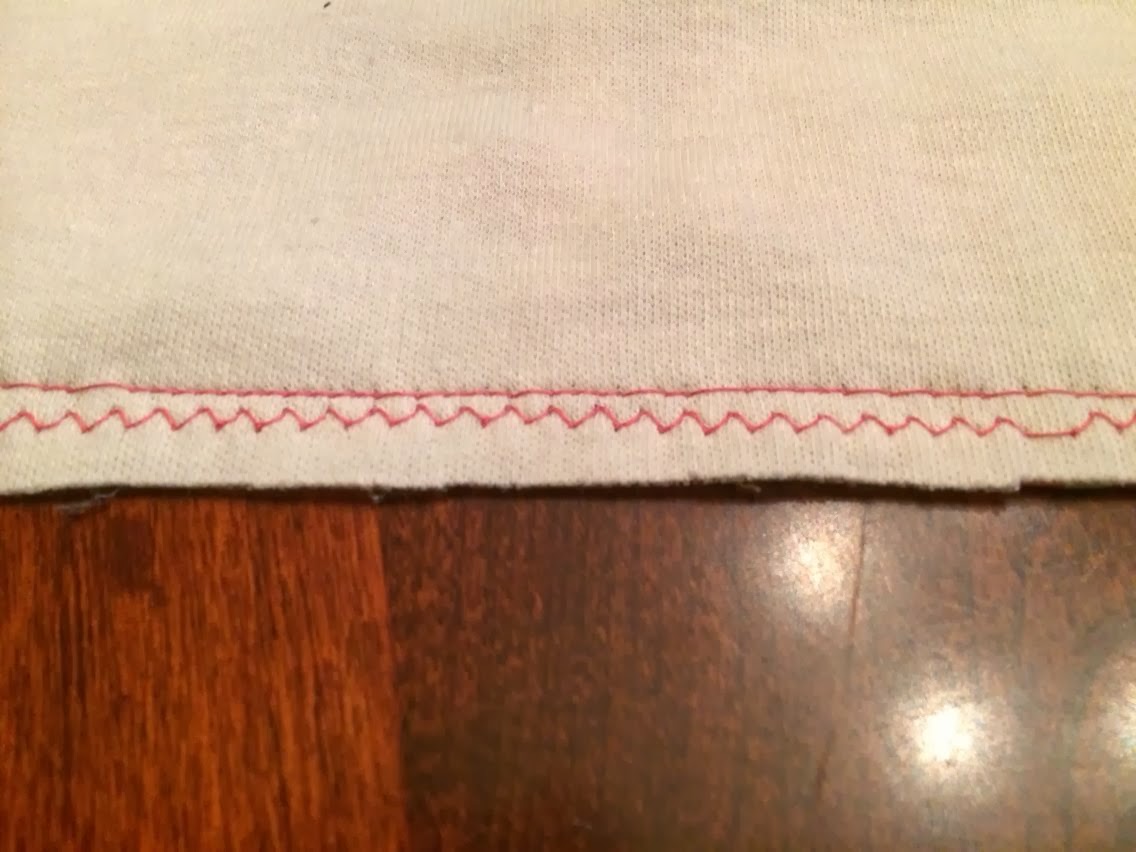
 I used a straight stitch and finished my seams with a zig-zag stitch to prevent the fabric from fraying.

3. Turn the tube inside out, place the two short ends together with the knit fabric sides facing out, and sew along the edge. This seam can be worn at the back of your neck so you won't be able to see it.

This is the simplest way to finish your scarf. If you'd like a neater seam, you can follow the tutorials found here and here.

That's all there is to it! I told you it was easy.

DIY: Glitter Shoes

This might sound crazy, but I recently decided to cut back on clothes shopping. I do have a slight shopping addiction, I will admit that, but I haven't put myself into serious debt (yet!). My biggest problem is that I tend to shop for clothes when I'm stressed, overwhelmed, or experiencing the mean reds. As a recent college graduate who is currently job hunting, this has become quite the problem in the past few months.

In order to stop myself from buying new things, I've decided to use my crafting skills for good and restyle some of the things I already own. After making the decision to severely limit my clothes purchases, I found the perfect dress in my closet to wear to a wedding this month...but then I couldn't find the right shoes to wear! That's when I got the idea to DIY some glitter heels from a tutorial I had pinned a few weeks ago. I really liked the look of these glittered shoes, so I kept the wedge part black and just added gold glitter.
You'll need to gather the following supplies -

  • Shoes
  • Glitter (I used Martha Stewart coarse glitter in Florentine Gold)
  • Mod Podge or some type of glue (Martha Stewart also sells glue to mix glitter into)
  • Paint brush or foam brush
  • Painter's Tape
  • Clear Sealer (I used Krylon Glitter Blast)
  • Newspaper
Once you have all your supplies together, you'll want to make sure your surface is covered with newspaper because this can get messy (you will find glitter on everything!). Wipe off your shoes with a damp cloth and make sure they're completely dry before starting. Tape off any areas that you don't want glitter on that are directly next to the areas you will be "glittering". Now you're ready to go!

Mix together equal parts glue & glitter in a separate container, making sure the glitter is well combined.
(This is NOT well combined, I just wanted to show what the glitter/glue should look like)

Apply the glitter glue in even layers to the parts of the shoes you want glittered. You'll need to apply
3-4 layers of the glitter mixture in order to get good coverage. Make sure the layers aren't too thick or else it will take FOREVER for each layer to dry. You want each layer to dry at least most of the way before applying another layer.
After your final layer is applied, LIGHTLY sprinkle some loose glitter onto the still wet layer to fill in any gaps. Just keep in mind that this glitter might fall off as the shoes are worn, even after they're sprayed with the sealer.

After the glitter glue is completely dry, carefully remove the tape. Some of the glitter layer started to peel off with the tape, so make sure you press down on the glitter part as you peel the tape. Spray the shoes with the clear sealer, following the directions on the can. Make sure you do this in a well-ventilated area or outside, this stuff is strong! Allow your shoes to dry overnight.
Tada! Glitter shoes that you can wear to dance the night away.

Tour Life: Part 2 - Eating on the Road

I have to admit that I can be a creature of habit. I always eat breakfast and drink a cup of coffee first thing in the morning. Unfortunately, that becomes a luxury when you have to check in and out of a hotel daily. I wish I could take my Keurig coffee maker everywhere, it would make mornings so much easier!

Adam & I eat fairly healthy, so finding healthy options on the road can sometimes be tough. We make sure to stock up on protein bars, Kind bars, beef jerky, trail mix, and bottled water before trips so we have snacks to hold us over. We like to try local restaurants when we can, and If all else fails, we search for the nearest Panera.

One of our favorite local finds was Doumar's, a tiny diner in Norfolk, Virginia where they make their own waffle cones. We both had the pulled pork sandwich and their famous homemade ice cream cones. The prices were so cheap and the food was great! If you're ever in the area, I highly recommend stopping in. They also have a drive-up area if you prefer to eat in your car, but I enjoyed sitting in the diner and people watching ;)
Clockwise from top left: Doumar's famous ice cream cones, inside Doumar's Diner in Norfolk, VA, craft beer at Fox & Hound, Panera 

Tour Life: Part 1 - New York City

I agreed to join my boyfriend this month on a 3-week roadtrip along the East Coast. My boyfriend Adam is a comedian who performs stand-up comedy at colleges across the country (if you want to check out his website, click here. Trust me, he's hilarious!). Since I'm not currently working, I thought this would be the perfect time to travel. We were hit by a late snowstorm the night before our trip, which was even more incentive for me to leave Chicago for a little while. We packed as much as we could fit into Adam's car & headed out east. 

I learned pretty quickly that touring is not like a vacation (ie. lots of driving and switching hotels every night), but it does have its perks. We tried to see and do as much as possible on the days that Adam didn't have a show, like visiting the battlegrounds at Gettysburg and eating at local diners. My favorite part of the trip was our first weekend, which we spent in New York City. 
Clockwise from top left: The Plaza Hotel, Rockefeller Center, The Dakota, skyline view from the Long Island ferry

Since it was Adam's first time in NYC, we tried to fit in as much as possible during our time there. We visited Times Square, which was really hectic since there was a huge group of protestors walking through! Then we walked down 5th Ave, visited St. Patrick's Cathedral, and stopped in Tiffany's. I'm pretty sure I terrified Adam with my unnecessary and extensive knowledge of Tiffany & Co. I swear it's because of my love for Audrey Hepburn and the movie Breakfast at Tiffany's. Anyways, after that we walked around The Plaza Hotel for a few minutes and then headed to Central Park. We finished our tour with a visit to The Dakota, which is the apartment complex where John Lennon was shot and killed (it's also where Rosemary's Baby was filmed, which makes this place extra creepy).

We were back in New York a few days later when Adam had a show on Long Island. We took the Long Island Ferry to Manhattan and the subway to Brooklyn for a Brooklyn Nets game at the Barclay's Center. I had the fanciest hotdog ever, called a Brooklyn Dog. Sorry Chicago, but this was the best hotdog I've ever had!
Sadly, we had to say goodbye to New York and head further south for the rest of Adam's tour. Don't worry New York, we will be back! For more Brooklyn dogs, I'm sure ;)


Teenage Dream

Top- Forever 21
Skirt- Target
Belt- Urban Outfitters
Purse- Forever 21
Socks- J. Crew
Shoes- Steve Madden


I have a confession to make...I love Valentine's Day. Even when I don't have someone to call my valentine, I still love the girliness of the holiday. Everything is covered in pink and red hearts or pretty florals. It just breaks up the dreariness of winter.

When I was a junior in high school, I had to work on Valentine's Day. When I got to my car after my shift, there was a single red rose on the windshield. I had no idea who had left it! It wasn't until years later that my parents finally admitted that the rose was left by them, not a secret admirer as I originally thought. As embarassing as that may sound, it was endearing to know that my parents wanted to protect my fragile heart during one of the toughest times in a young girl's life. So thanks, mom & dad.

I have to say that although I've never had a perfect Valentine's Day, I still look forward to it every year. Do you have any memorable Valentine's Day stories?

The Girl With Kaleidescope Eyes

One of the resolutions that I made for 2011 was to sew more, so I dragged out my sewing machine and got to work. With the help of my aunt, I finally figured out how to use it properly. I made this skirt about 1 month ago, but it took me until now to try it on! I should have made a resolution to be less of a procrastinator...oh well. So here it is, I call it my kaleidescope skirt. I thought this print would be cute paired with a bright top and flat sandals come spring, but I decided to throw on some bright tights and a scarf for now. Now if this snow would just go away...


T-shirt- Forever 21
Scarf- World Market
Skirt- Made by me
Tights- American Apparel


My cousin Kathleen made one too, she's wearing it in this picture-

Can you tell that we're related? We even dress alike!

My latest obsession.

I decided to scrap the rest of my 2010 recap in favor of new, fresh ideas. Why dwell on the past when you can plan for the future, right?

Lately, I've become obsessed with ombre hair color. I know it's not a new trend by any means, but I've recently decided that I like the look of two-toned hair. My hair is in desperate need of a change, it's been one shade shy of black for quite some time now.

I found some perfect examples of ombre hair done right, enjoy!


Practical Magic.

I still can't believe this year is almost over, where did 2010 go?! I'm not too thrilled about October being over, since it is one of my favorite months. BUT...December is by far the most magical month of the year. December will be filled with birthdays (mine included), present buying, snow falling, tree decorating, and GRADUATION!! I can't wait :)

Speaking of magical, I just watched one of my all-time favorite movies, Practical Magic (cheesy, I know). I'm not a fan of scary, gore-filled movies, so I tend to stay away from those come Halloween. If you haven't already seen Practical Magic, I highly recommend it.

It stars Sandra Bullock and Nicole Kidman as Sally and Jillian Owens, who come from a long line of witches. They're sent to live with their two aunts at a young age and discover that the Owens women are cursed-they are all unlucky when it comes to love. The movie basically centers around Sally and Jillian and their romantic relationships, but the scenery is what drew me in from the very beginning. The aunts' Victorian home is absolutely stunning!


Stockard Channing and Diane Weist as the aunts.

It's not the strongest storyline, but how can you go wrong with a great cast, beautiful sets, and a little witchcraft? This movie makes me wish I grew up on the east coast in a small coastal town filled with rich history and Victorian mansions.

Not only does it happen to be one of my favorites, but my friend Cait also shares my love for this movie. I wonder why we love it so much? :)


all images (except the last one) were found via Google.

Once upon a midnight dreary...


Sweater top: Ruehl
Skirt: Free People
Dot sheer tights: J.Crew
Shoes: Jeffrey Campbell


My family takes Halloween very seriously. We go all out with decorations, as you can see from the pictures above. I blame it on my mother's love of Martha Stewart, but I don't mind it one bit. This is my favorite time of year, and I never miss a chance to carve pumpkins and dress up for Halloween. Even my favorite memories from english class were reading Edgar Allan Poe short stories and poems. I couldn't get enough of the dark, macabre settings and themes in his writing. 


Another favorite of mine is incorporating fall colors into my wardrobe. I die for pumpkin orange, mustard yellow, and deep plum. That's why I fell in love with these t-strap shoes a few years ago. The back and sides are a beautiful mustard yellow with a silver border around the strap. They really are the perfect fall shoe.


Speaking of Halloween, I put the finishing touches on my costume the other night! My friends are having a costume party complete with a pig roast, it should make for an interesting night. 

Here Come the Hawks

 If you need to know anything about me as a person, you have to know that I am a hockey fan. I come from what you would call a "hockey family". My dad was born in Montreal, Quebec, Canada in the 1960's, when the Canadians were the team to beat. You would think that my dad was a die-hard Montreal Canadians fan growing up, but you would be very wrong. My dad, and his 2 brothers, LOVED the Blackhawks. They experienced many a fight in grade school over it, but their loyalty to the Hawks never wavered. It's no surprise that my brother grew up playing hockey, and I spent a few years taking figure skating lessons. Looking back, I wish I would've chosen to play hockey instead! Watching my brother play and watching Blackhawks games was a big part of my childhood. I've been to many different cities to watch my bro compete in tournaments, including Boston, Pittsburg, and Toronto. Of course, no trip to Toronto was complete without a stop at the Hockey Hall of Fame. I've been there more times than I've been to Disneyworld!

My brother, Angelo, after winning State. He was pretty excited, can you tell?

Naturally, my favorite team has always been the Chicago Blackhawks. My brother and I both have winter birthdays so hockey-themed parties were a must. What did I do for my 21st? I invited a group of my friends to a Hawks game at the United Center, of course.

My friend Doug & I at the United Center on my 21st birthday.

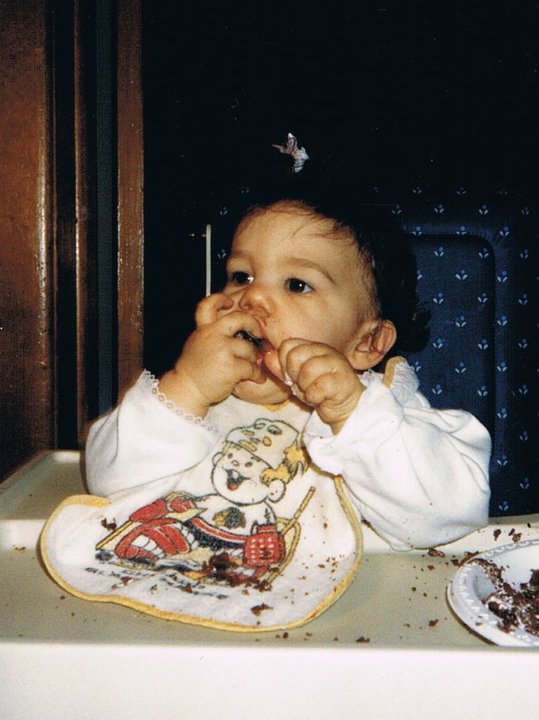
My 1st birthday, wearing chocolate cake & a Blackhawks bib.

So you can imagine how excited my family is that the Chicago Blackhawks are going to the Stanley Cup Finals! The cup hasn't come to Chicago since 1961, unless you count the times that Chris Chelios brought it after winning with the Red Wings (Don't even get me started...)
This Saturday is the first game of the Stanley Cup Finals against the Philadelphia Flyers, and you know I'll be wearing my red,black, and white proudly!

LET'S GO HAWKS!!

Cait & I
(photo courtesy of Cait)