Showing posts with label DIY. Show all posts

The Essentials: Hair Products

I am lucky enough to have a best friend that is a very talented hair stylist (Hi Renee!) that always steers me in the right direction when it comes to taking care of my hair. I know that everyone's hair is different, so what works for me may not work for you. That being said, I think we can all appreciate a good deep conditioning treatment and beach spray. So here are the hair products that I consider to be essential for keeping my hair looking its best.
Healthy Sexy Hair Shampoo, Conditioner, and Leave In Conditioner - What can I say, I'm obviously a big fan of this line of products by Sexy Hair. The shampoo and conditioner are safe to use on color treated hair, they're sulfate, paraben, and gluten free, and they're moisturizing enough to use every day. They have a subtle scent, but that doesn't bother me since I use so many products after washing my hair.
I recently started using the leave in conditioner, but I know it will come in handy come summer. My ombrè ends tend to dry out in the summer, so this leave in conditioner should do the trick. It's moisturizing without leaving a greasy finish, and my hair looks and feels so healthy after blow drying!

DIY Hair Mask - I use this DIY combo every other week or when my ends start to feel a little on the dry side. It smells amazing and it's a great way to pamper yourself on the weekends. Apply it to your hair, throw it up into a bun, and relax for 30-40 mins (I usually read or paint my nails). Make sure you wash it out really well with shampoo and follow up with conditioner, you want your hair to look healthy and shiny, not greasy!

Bumble & Bumble Surf Spray -  No wonder there is a cult-like following for this spray, it's the best on the market in my opinion! It gives my fine, straight hair just the right amount of grit and texture for that "I just spent the day at the beach" look. It even smells like the ocean. I use it on damp hair before blow drying, on dry hair before curling, and as a refresher on day-old curls. It seriously works miracles on my hair. 

Not Your Mother's Beach Babe Sea Salt Spray - I tried this sea spray as an inexpensive alternative to B&B's (which is not cheap!). It smells like coconut (love) and is a bit more moisturizing than the surf spray (also love). I don't get as much volume from this spray, but I still switch off regularly between the two. 

Paul Mitchell Super Skinny Serum - I'll use this before blowdrying if I want to give my hair a sleek, shiny look. My hair is naturally straight, but this serum gives it a glossy sheen that doesn't look greasy. It helps speed up the drying process and it smells delicious, kinda like candy.

Not Your Mother's Beat the Heat Thermal Spray - I'm guilty of blowdrying my hair almost everyday, so I try to make up for the heat damage by using this on dry hair before straightening or curling. It gives a slight, flexible hold so there's no need for hairspray (which I can't seem to find one I like, shocking isn't it?).

Suave Dry Shampoo Spray - I'll be honest. I use this because it's less than $3. And it smells like pineapple. Oh yeah, and it works. I know that not washing your hair everyday is actually good for it, but I HATE how greasy and flat my hair can get. That's where this gem comes in. It soaks up the unwanted oil, gives my hair some body, and smells like a tropical drink. All for $3 a can. You can't beat that.

Other sources- 
For a great list of beach sprays for all hair types, check out The Beauty Department.
To make your own beach spray and leave in conditioner, check out Sunnie Brook's blog.
If you're not familiar with using dry shampoo, check out this blog post from The Beauty Department. 

Have you used any of these products? Let me know what you use in the comments. Also, hair spray suggestions would be greatly appreciated!

DIY Gift Idea- Cozy Flannel Infinity Scarf

If you're anything like me, the thought of finding parking, fighting crowds, and standing in line for hours at the mall is enough to keep you locked up in your house with a big glass of wine. Here's my solution- handmade gifts! All you need can be found in one store (preferably Jo-Ann Fabrics, of course), and you can cross a few people off your list in one weekend. Not to mention the fact that your one-of-a-kind gift beats out a gift card for originality and thoughtfulness. And the best part about it? You can still have that big glass of wine while making these gifts, they're that easy.

Here's the first gift idea, it's the perfect accessory for chilly winter days.


Here's what you'll need-

2 yards* shirting weight flannel (it's thinner & drapes better)
2 yards* solid knit fabric
Thread
A sewing machine
Fabric scissors

*You can actually use 1 yard of each fabric if you don't mind having a seam in your fabric where you sew the 2 pieces together, otherwise you'll actually have enough to make 2 scarves!

Directions -
1. Measure and cut your fabric into 62 in x 22 in rectangles. This is the size that I used, but you can change the measurements to whatever you want.


2. Pin your 2 rectangles together along the long edges and sew the two sides. You should have a long tube with openings on either end.

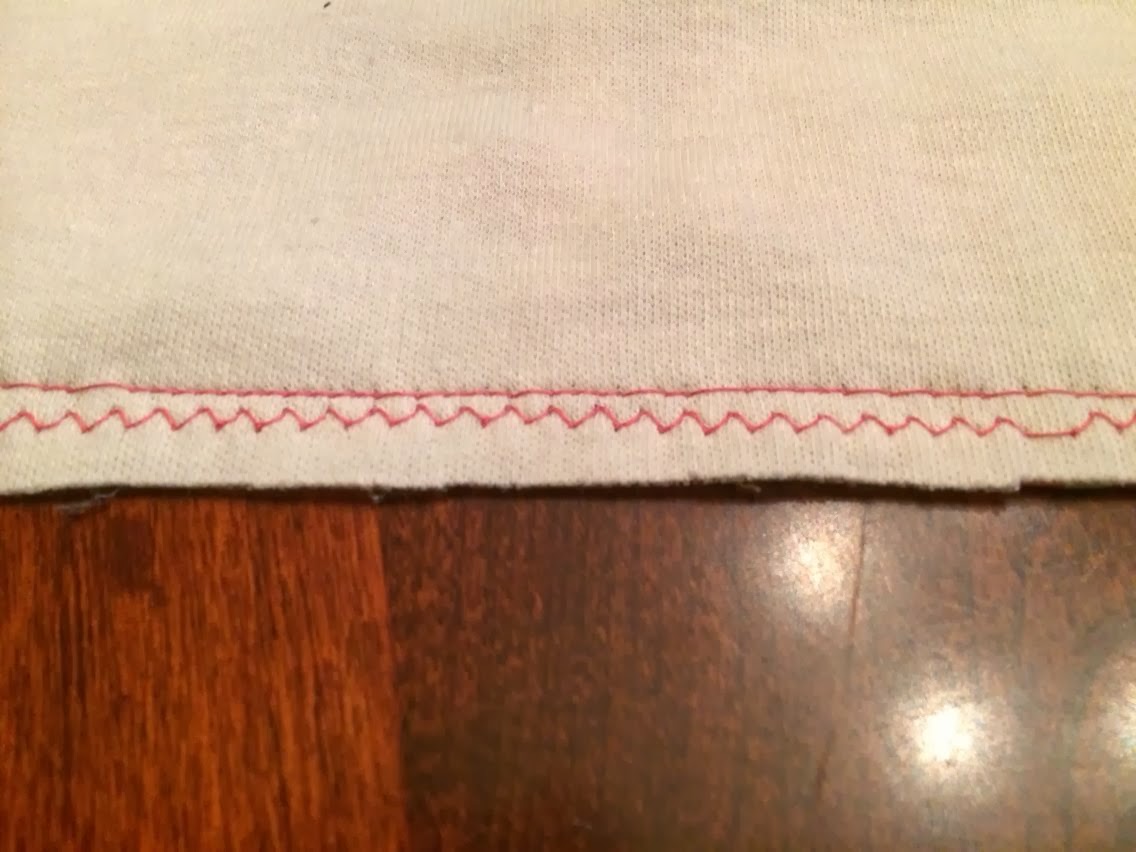
 I used a straight stitch and finished my seams with a zig-zag stitch to prevent the fabric from fraying.

3. Turn the tube inside out, place the two short ends together with the knit fabric sides facing out, and sew along the edge. This seam can be worn at the back of your neck so you won't be able to see it.

This is the simplest way to finish your scarf. If you'd like a neater seam, you can follow the tutorials found here and here.

That's all there is to it! I told you it was easy.

DIY: Glitter Shoes

This might sound crazy, but I recently decided to cut back on clothes shopping. I do have a slight shopping addiction, I will admit that, but I haven't put myself into serious debt (yet!). My biggest problem is that I tend to shop for clothes when I'm stressed, overwhelmed, or experiencing the mean reds. As a recent college graduate who is currently job hunting, this has become quite the problem in the past few months.

In order to stop myself from buying new things, I've decided to use my crafting skills for good and restyle some of the things I already own. After making the decision to severely limit my clothes purchases, I found the perfect dress in my closet to wear to a wedding this month...but then I couldn't find the right shoes to wear! That's when I got the idea to DIY some glitter heels from a tutorial I had pinned a few weeks ago. I really liked the look of these glittered shoes, so I kept the wedge part black and just added gold glitter.
You'll need to gather the following supplies -

  • Shoes
  • Glitter (I used Martha Stewart coarse glitter in Florentine Gold)
  • Mod Podge or some type of glue (Martha Stewart also sells glue to mix glitter into)
  • Paint brush or foam brush
  • Painter's Tape
  • Clear Sealer (I used Krylon Glitter Blast)
  • Newspaper
Once you have all your supplies together, you'll want to make sure your surface is covered with newspaper because this can get messy (you will find glitter on everything!). Wipe off your shoes with a damp cloth and make sure they're completely dry before starting. Tape off any areas that you don't want glitter on that are directly next to the areas you will be "glittering". Now you're ready to go!

Mix together equal parts glue & glitter in a separate container, making sure the glitter is well combined.
(This is NOT well combined, I just wanted to show what the glitter/glue should look like)

Apply the glitter glue in even layers to the parts of the shoes you want glittered. You'll need to apply
3-4 layers of the glitter mixture in order to get good coverage. Make sure the layers aren't too thick or else it will take FOREVER for each layer to dry. You want each layer to dry at least most of the way before applying another layer.
After your final layer is applied, LIGHTLY sprinkle some loose glitter onto the still wet layer to fill in any gaps. Just keep in mind that this glitter might fall off as the shoes are worn, even after they're sprayed with the sealer.

After the glitter glue is completely dry, carefully remove the tape. Some of the glitter layer started to peel off with the tape, so make sure you press down on the glitter part as you peel the tape. Spray the shoes with the clear sealer, following the directions on the can. Make sure you do this in a well-ventilated area or outside, this stuff is strong! Allow your shoes to dry overnight.
Tada! Glitter shoes that you can wear to dance the night away.